
SwiftGL
Textures
We learned that to add more detail to our objects we can use colors for each vertex to create some interesting images. However, to get a fair bit of realism we’d have to have many vertices so we could specify a lot of colors. This takes up a considerable amount of extra overhead, since each models needs a lot more vertices and for each vertex a color attribute as well.
What artists and programmers generally prefer is to use a texture. A texture is a 2D image (even 1D and 3D textures exist) used to add detail to an object; think of a texture as a piece of paper with a nice brick image (for example) on it neatly folded over your 3D house so it looks like your house has a stone exterior. Because we can insert a lot of detail in a single image, we can give the illusion the object is extremely detailed without having to specify extra vertices.
Aside from images, textures can also be used to store a large collection of data to send to the shaders, but we’ll leave that for a different topic.
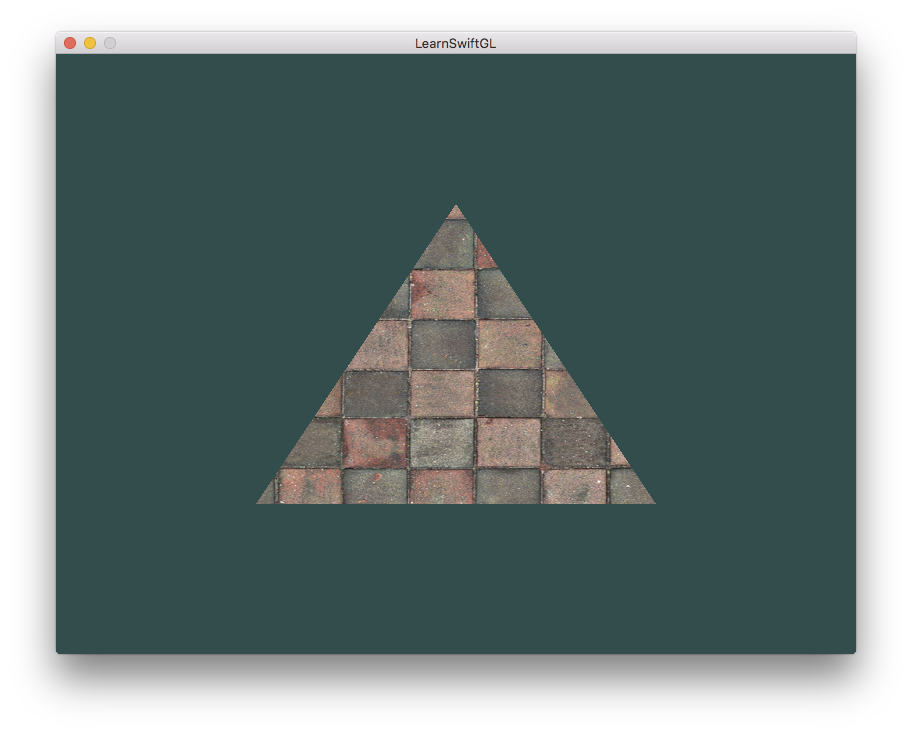
Below you’ll see a texture image of a brick wall mapped to the triangle from the previous tutorial.
In order to map a texture to the triangle we need to tell each vertex of the triangle which part of the texture it corresponds to. Each vertex should thus have a texture coordinate associated with them that specifies what part of the texture image to sample from. Fragment interpolation then does the rest for the other fragments.
Texture coordinates range from 0 to 1 in the x and y axis (remember that we use 2D texture images). Retrieving the texture color using texture coordinates is called sampling. Texture coordinates start at (0,0) for the lower left corner of a texture image to (1,1) for the upper right corner of a texture image. The following image shows how we map texture coordinates to the triangle:
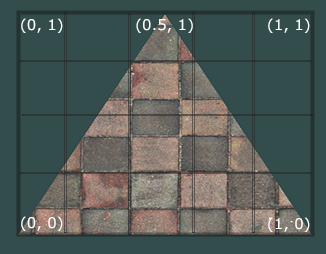
We specify 3 texture coordinate points for the triangle. We want the bottom-left side of the triangle to correspond with the bottom-left side of the texture so we use the (0,0) texture coordinate for the triangle’s bottom-left vertex. The same applies to the bottom-right side with a (1,0) texture coordinate. The top of the triangle should correspond with the top-center of the texture image so we take (0.5,1.0) as its texture coordinate. We only have to pass 3 texture coordinates to the vertex shader, which then passes those to the fragment shader that neatly interpolates all the texture coordinates for each fragment.
The resulting texture coordinates would then look like this:
let texCoords:[GLfloat] = [
    0.0, 0.0,  // Lower-left corner
    1.0, 0.0,  // Lower-right corner
    0.5, 1.0   // Top-center corner
]
Texture sampling has a loose interpretation and can be done in many different ways. It is thus our job to tell OpenGL how it should sample its textures.
Texture Wrapping
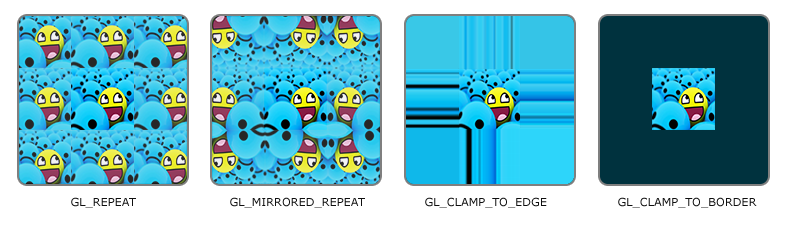
Texture coordinates usually range from (0,0) to (1,1) but what happens if we specify coordinates outside this range? The default behavior of OpenGL is to repeat the texture images (we basically ignore the integer part of the floating point texture coordinate), but there are more options OpenGL offers:
GL_REPEAT: The default behavior for textures. Repeats the texture image.GL_MIRRORED_REPEAT: Same asGL_REPEATbut mirrors the image with each repeat.GL_CLAMP_TO_EDGE: Clamps the coordinates between 0 and 1. The result is that higher coordinates become clamped to the edge, resulting in a stretched edge pattern.GL_CLAMP_TO_BORDER: Coordinates outside the range are now given a user-specified border color.
Each of the options have a different visual output when using texture coordinates outside the default range. Let’s see what these look like on a sample texture image:
Each of the aforementioned options can be set per coordinate axis (s, t (and r if you’re using 3D textures) equivalent to x,y,z) with the glTexParameter* function:
glTexParameteri(GL_TEXTURE_2D, GL_TEXTURE_WRAP_S, GL_MIRRORED_REPEAT)
glTexParameteri(GL_TEXTURE_2D, GL_TEXTURE_WRAP_T, GL_MIRRORED_REPEAT)
The first argument specifies the texture target; we’re working with 2D textures so the texture target is GL_TEXTURE_2D. The second argument requires us to tell what option we want to set and for which texture axis. We want to configure the WRAP option and specify it for both the S and T axis. The last argument requires us to pass in the texture wrapping mode we’d like and in this case OpenGL will set its texture wrapping option on the currently active texture with GL_MIRRORED_REPEAT.
If we choose the GL_CLAMP_TO_BORDER option we should also specify a border color. This is done using the fv equivalent of the glTexParameter function with GL_TEXTURE_BORDER_COLOR as its option where we pass in a float array of the border’s color value:
let borderColor:[GLfloat] = [ 1.0, 1.0, 0.0, 1.0 ]
glTexParameterfv(GL_TEXTURE_2D, GL_TEXTURE_BORDER_COLOR, borderColor)
Texture Filtering
Texture coordinates do not depend on resolution but can be any floating point value, thus OpenGL has to figure out which texture pixel (also known as a texel) to map the texture coordinate to. This becomes especially important if you have a very large object and a low resolution texture. You probably guessed by now that OpenGL has options for this texture filtering as well. There are several options available but for now we’ll discuss the most important options: GL_NEAREST and GL_LINEAR.
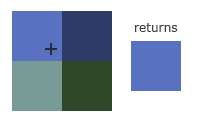
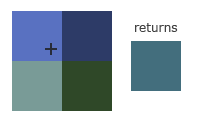
GL_NEAREST (also known as nearest neighbor filtering) is the default texture filtering method of OpenGL. When set to GL_NEAREST, OpenGL selects the pixel which center is closest to the texture coordinate. Below you can see 4 pixels where the cross represents the exact texture coordinate. The upper-left texel has its center closest to the texture coordinate and is therefore chosen as the sampled color:
GL_LINEAR (also known as (bi)linear filtering) takes an interpolated value from the texture coordinate’s neighboring texels, approximating a color between the texels. The smaller the distance from the texture coordinate to a texel’s center, the more that texel’s color contributes to the sampled color. Below we can see that a mixed color of the neighboring pixels is returned:
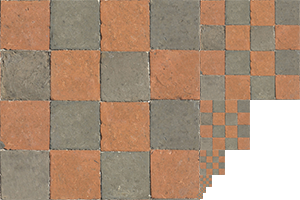
But what is the visual effect of such a texture filtering method? Let’s see how these methods work when using a texture with a low resolution on a large object (texture is therefore scaled upwards and individual texels are noticeable):

GL_NEAREST results in blocked patterns where we can clearly see the pixels that form the texture while GL_LINEAR produces a smoother pattern where the individual pixels are less visible. GL_LINEAR produces a more realistic output, but some developers prefer a more 8-bit look and as a result pick the GL_NEAREST option.
Texture filtering can be set for magnifying and minifying operations (when scaling up or downwards) so you could for example use nearest neighbor filtering when textures are scaled downwards and linear filtering for upscaled textures. We thus have to specify the filtering method for both options via glTexParameter*. The code should look similar to setting the wrapping method:
glTexParameteri(GL_TEXTURE_2D, GL_TEXTURE_MIN_FILTER, GL_NEAREST)
glTexParameteri(GL_TEXTURE_2D, GL_TEXTURE_MAG_FILTER, GL_LINEAR)
Mipmaps
Imagine if we had a large room with thousands of objects, each with an attached texture. There will be objects far away that have the same high resolution texture attached as the objects close to the viewer. Since the objects are far away and probably only produce a few fragments, OpenGL has difficulties retrieving the right color value for its fragment from the high resolution texture, since it has to pick a texture color for a fragment that spans a large part of the texture. This will produce visible artifacts on small objects, not to mention the waste of memory to use high resolution textures on small objects.
To solve this issue OpenGL uses a concept called mipmaps that is basically a collection of texture images where each subsequent texture is twice as small compared to the previous one. The idea behind mipmaps should be easy to understand: after a certain distance threshold from the viewer, OpenGL will use a different mipmap texture that best suits the distance to the object. Because the object is far away, the smaller resolution will not be noticeable to the user. Also, mipmaps have the added bonus feature that they’re good for performance as well. Let’s take a closer look at what a mipmapped texture looks like:
Creating a collection of mipmapped textures for each texture image is cumbersome to do manually, but luckily OpenGL is able to do all the work for us with a single call to glGenerateMipmaps after we’ve created a texture. Later in the texture tutorial you’ll see use of this function.
When switching between mipmaps levels during rendering OpenGL might show some artifacts like sharp edges visible between the two mipmap layers. Just like normal texture filtering, it is also possible to filter between mipmap levels using NEAREST and LINEAR filtering for switching between mipmap levels. To specify the filtering method between mipmap levels we can replace the original filtering methods with one of the following four options:
GL_NEAREST_MIPMAP_NEAREST: takes the nearest mipmap to match the pixel size and uses nearest neighbor interpolation for texture sampling.GL_LINEAR_MIPMAP_NEAREST: takes the nearest mipmap level and samples using linear interpolation.GL_NEAREST_MIPMAP_LINEAR: linearly interpolates between the two mipmaps that most closely match the size of a pixel and samples via nearest neighbor interpolation.GL_LINEAR_MIPMAP_LINEAR: linearly interpolates between the two closest mipmaps and samples the texture via linear interpolation.
Just like texture filtering we can set the filtering method to one of the 4 aforementioned methods using glTexParameteri:
glTexParameteri(GL_TEXTURE_2D, GL_TEXTURE_MIN_FILTER, GL_LINEAR_MIPMAP_LINEAR)
glTexParameteri(GL_TEXTURE_2D, GL_TEXTURE_MAG_FILTER, GL_LINEAR)
A common mistake is to set one of the mipmap filtering options as the magnification filter. This doesn’t have any effect since mipmaps are primarily used for when textures get downscaled: texture magnification doesn’t use mipmaps and giving it a mipmap filtering option will generate an OpenGL GL_INVALID_ENUM error code.
Loading and creating textures
The first thing we need to do to actually use textures is to load them into our application. Texture images can be stored in dozens of file formats, each with their own structure and ordering of data, so how do we get those images in our application? SwiftGL has a library especially for this.
import SGLImageFor the following texture sections we’re going to use an image of a wooden container. Loading an image is done in two stages. First, we create an SGLImageLoader by telling it the filename of the image.
// Load image from disk
let loader = SGLImageLoader(fromFile: "container.png")
if (loader.error != nil) { fatalError(loader.error!) }
At this point we should check if there’s an error. The usual errors here would be from the file not being found or the format not being recognized. You can also query for the size, number of channels, or anything else that you need to know about the file.
We want an ‘SGLImageRGB
let image = SGLImageRGB<UInt8>(loader)
if (loader.error != nil) { fatalError(loader.error!) }
We check the loader once again in case there were problems during the loading process. If there are no errors, you have the image in memory in a format ready to be passed to OpenGL.
Generating a texture
Like any of the previous objects in OpenGL, textures are referenced with an ID; let’s create one:
var texture:GLuint = 0
glGenTextures(1, &texture)
The glGenTextures function first takes as input how many textures we want to generate and stores them in a GLuint array given as its second argument (in our case just a single GLuint). Just like other objects we need to bind it so any subsequent texture commands will configure the currently bound texture:
glBindTexture(GL_TEXTURE_2D, texture)Now that the texture is bound, we can start generating a texture using the previously loaded image data. Textures are generated with glTexImage2D:
image.withUnsafeMutableBufferPointer() {
    glTexImage2D(GL_TEXTURE_2D, 0, GL_RGB,
        GLsizei(image.width),
        GLsizei(image.height),
        0, GL_RGB, GL_UNSIGNED_BYTE,
        $0.baseAddress)
}
glGenerateMipmap(GL_TEXTURE_2D)
This is a large function with quite a few parameters so we’ll walk through them step-by-step:
- The first argument specifies the texture target; setting this to
GL_TEXTURE_2Dmeans this operation will generate a texture on the currently bound texture object at the same target (so any textures bound to targetsGL_TEXTURE_1DorGL_TEXTURE_3Dwill not be affected). - The second argument specifies the mipmap level for which we want to create a texture for if you want to set each mipmap level manually, but we’ll leave it at the base level which is 0.
- The third argument tells OpenGL in what kind of format we want to store the texture. Our image has only RGB values so we’ll store the texture with RGB values as well.
- The 4th and 5th argument sets the width and height of the resulting texture. We can get those from the image object.
- The next argument should always be 0 (some legacy stuff).
- The 7th and 8th argument specify the format and datatype of the source image. We loaded the image with RGB values and stored them as chars (bytes) so we’ll pass in the corresponding values.
- The last argument is the actual image data.
Once glTexImage2D is called, the currently bound texture object now has the texture image attached to it. However, currently it only has the base-level of the texture image loaded and if we want to use mipmaps we have to specify all the different images manually (by continually incrementing the second argument) or, we could call glGenerateMipmap after generating the texture. This will automatically generate all the required mipmaps for the currently bound texture.
After we’re done generating the texture and its corresponding mipmaps, it is good practice to unbind the texture object:
glBindTexture(GL_TEXTURE_2D, 0)The whole process of generating a texture thus looks something like this:
var texture:GLuint = 0
glGenTextures(1, &texture)
glBindTexture(GL_TEXTURE_2D, texture)

    // Set texture wrapping to GL_REPEAT (usually basic wrapping method)
    glTexParameteri(GL_TEXTURE_2D, GL_TEXTURE_WRAP_S, GL_REPEAT)
    glTexParameteri(GL_TEXTURE_2D, GL_TEXTURE_WRAP_T, GL_REPEAT)

    // Set texture filtering parameters
    glTexParameteri(GL_TEXTURE_2D, GL_TEXTURE_MIN_FILTER, GL_LINEAR)
    glTexParameteri(GL_TEXTURE_2D, GL_TEXTURE_MAG_FILTER, GL_LINEAR)

    // Load and generate the texture
    let loader = SGLImageLoader(fromFile: "container.png")
    if (loader.error != nil) { fatalError(loader.error!) }
    let image = SGLImageRGB<UInt8>(loader)
    if (loader.error != nil) { fatalError(loader.error!) }

    // Create texture and generate mipmaps
    image.withUnsafeMutableBufferPointer() {
        glTexImage2D(GL_TEXTURE_2D, 0, GL_RGB,
            GLsizei(image.width),
            GLsizei(image.height),
            0, GL_RGB, GL_UNSIGNED_BYTE,
            $0.baseAddress)
    }
    glGenerateMipmap(GL_TEXTURE_2D)

glBindTexture(GL_TEXTURE_2D, 0)
Applying textures
For the upcoming sections we will use the rectangle shape drawn with glDrawElements from the final part of the Hello-Triangle tutorial. We need to inform OpenGL how to sample the texture so we’ll have to update the vertex data with the texture coordinates:
let vertices:[GLfloat] = [
    // Positions       // Colors        // Texture Coords
     0.5,  0.5, 0.0,   1.0, 0.0, 0.0,   1.0, 1.0, // Top Right
     0.5, -0.5, 0.0,   0.0, 1.0, 0.0,   1.0, 0.0, // Bottom Right
    -0.5, -0.5, 0.0,   0.0, 0.0, 1.0,   0.0, 0.0, // Bottom Left
    -0.5,  0.5, 0.0,   1.0, 1.0, 0.0,   0.0, 1.0  // Top Left
]
Since we’ve added an extra vertex attribute we again have to notify OpenGL of the new vertex format:
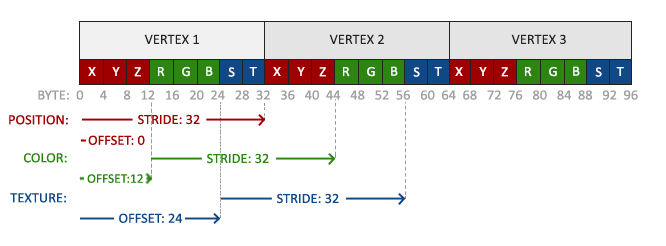
let pointer2offset = UnsafePointer<Void>(bitPattern: strideof(GLfloat) * 6)
glVertexAttribPointer(index: 2, size: 2, type: GL_FLOAT,
    normalized: false, stride: GLsizei(strideof(GLfloat) * 8), pointer: pointer2offset)
glEnableVertexAttribArray(2)
Note that we have to adjust the stride parameter of the previous two vertex attributes to strideof(GLfloat) * 8 as well.
Next we need to alter the vertex shader to accept the texture coordinates as a vertex attribute and then forward the coordinates to the fragment shader:
#version 330 core
layout (location = 0) in vec3 position;
layout (location = 1) in vec3 color;
layout (location = 2) in vec2 texCoord;

out vec3 ourColor;
out vec2 TexCoord;

void main()
{
    gl_Position = vec4(position, 1.0f);
    ourColor = color;
    TexCoord = texCoord;
}
The fragment shader should then accept the TexCoord output variable as an input variable.
The fragment shader should also have access to the texture object, but how do we pass the texture object to the fragment shader? GLSL has a built-in data-type for texture objects called a sampler that takes as a postfix the texture type we want e.g. sampler1D, sampler3D or in our case sampler2D. We can then add a texture to the fragment shader by simply declaring a uniform sampler2D that we later assign our texture to.
#version 330 core
in vec3 ourColor;
in vec2 TexCoord;

out vec4 color;

uniform sampler2D ourTexture;

void main()
{
    color = texture(ourTexture, TexCoord);
}
To sample the color of a texture we use GLSL’s built-in texture function that takes as its first argument a texture sampler and as its second argument the corresponding texture coordinate. The texture function then samples the corresponding color value using the texture parameters we set earlier. The output of this fragment shader is then the (filtered) color of the texture at the (interpolated) texture coordinate.
All that’s left to do now is to bind the texture before calling the glDrawElements and it will then automatically assign the texture to the fragment shader’s sampler:
glBindTexture(GL_TEXTURE_2D, texture)
glBindVertexArray(VAO)
glDrawElements(GL_TRIANGLES, 6, GL_UNSIGNED_INT, nil)
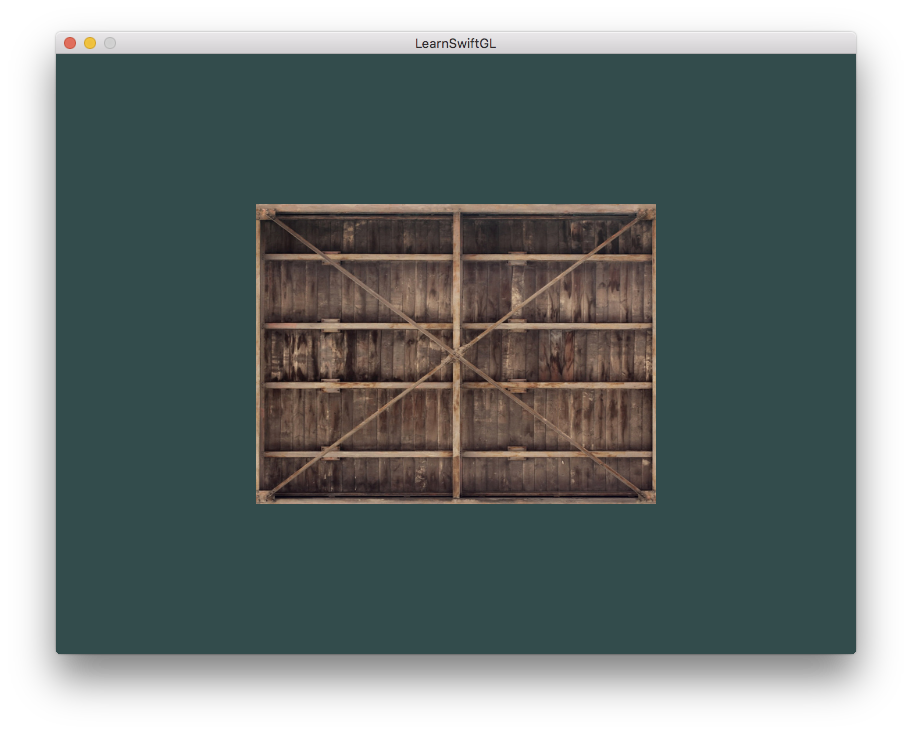
glBindVertexArray(0)If you did everything right you should see the following image:
If your rectangle is completely white or black you probably made an error along the way. Check your shader logs and try to compare your code with the application’s source code.
To get a little funky we can also mix the resulting texture color with the vertex colors. We simply multiply the resulting texture color with the vertex color in the fragment shader to mix both colors:
color = texture(ourTexture, TexCoord) * vec4(ourColor, 1.0f);The result should be a mixture of the vertex’s color and the texture’s color:
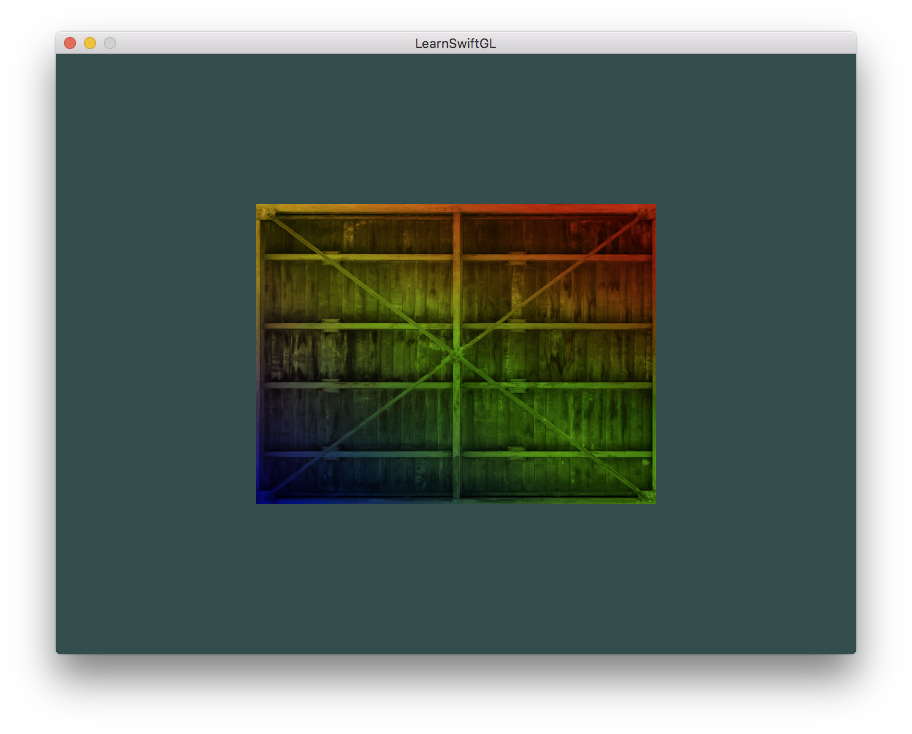
I guess you could say our container likes to disco.
Texture Units
You probably wondered why the sampler2D variable is a uniform if we didn’t even assign it some value with glUniform. Using glUniform1i we can actually assign a location value to the texture sampler so we can set multiple textures at once in a fragment shader. This location of a texture is more commonly known as a texture unit. The default texture unit for a texture is 0 which is the default active texture unit so we did not have to assign a location in the previous section.
The main purpose of texture units is to allow us to use more than 1 texture in our shaders. By assigning texture units to the samplers, we can bind to multiple textures at once as long as we activate the corresponding texture unit first. Just like glBindTexture we can activate texture units using glActiveTexture passing in the texture unit we’d like to use:
glActiveTexture(GL_TEXTURE0)
glBindTexture(GL_TEXTURE_2D, texture)
After activating a texture unit, a subsequent glBindTexture call will bind that texture to the currently active texture unit. Texture unit GL_TEXTURE0 is always by default activated, so we didn’t had to activate any texture units in the previous example when using glBindTexture.
OpenGL should have a at least a minimum of 16 texture units for you to use which you can activate using GL_TEXTURE0 to GL_TEXTURE15. They are defined in order so we could also get GL_TEXTURE8 via GL_TEXTURE0 + 8 for example, which is useful when we’d have to loop over several texture units.
We still however need to edit the fragment shader to accept another sampler. This should be relatively straightforward now:
#version 330 core
...

uniform sampler2D ourTexture1;
uniform sampler2D ourTexture2;

void main()
{
    vec4 tex1 = texture(ourTexture1, TexCoord);
    vec4 tex2 = texture(ourTexture2, TexCoord);
    color = vec4(mix(tex1.xyz, tex2.xyz, tex2.w), 1.0f);
}
The final output color is now the combination of two texture lookups. Our second texture will have an alpha channel tex2.w which we use to weight GLSL’s built-in mix function. mix takes two values as input and linearly interpolates between them based on its third argument. If the third value is 0.0 it returns the first input; if it’s 1.0 it returns the second input value.
We now want to load and create another texture. Make sure to create another texture object, load the image and generate the final texture using glTexImage2D. For the second texture we’ll use an image of your facial expression while learning OpenGL.
This image has an alpha channel which we want to get all the way to the fragment shader. For this to happen we need to change RGB to RGBA in three places. First, SGLImageRGBA is used instead of SGLImageRGB. The other two are in glTexImage2D so that OpenGL knows we are sending an alpha channel and it should store it to sample from.
var texture2:GLuint = 0

glGenTextures(1, &texture2)
glBindTexture(GL_TEXTURE_2D, texture2)

glTexParameteri(GL_TEXTURE_2D, GL_TEXTURE_WRAP_S, GL_REPEAT)
glTexParameteri(GL_TEXTURE_2D, GL_TEXTURE_WRAP_T, GL_REPEAT)

glTexParameteri(GL_TEXTURE_2D, GL_TEXTURE_MIN_FILTER, GL_LINEAR)
glTexParameteri(GL_TEXTURE_2D, GL_TEXTURE_MAG_FILTER, GL_LINEAR)

let loader2 = SGLImageLoader(fromFile: "awesomeface.png")
if (loader2.error != nil) { fatalError(loader2.error!) }

let image2 = SGLImageRGBA<UInt8>(loader2)
if (loader2.error != nil) { fatalError(loader2.error!) }

image2.withUnsafeMutableBufferPointer() {
    glTexImage2D(GL_TEXTURE_2D, 0, GL_RGBA,
        GLsizei(image2.width),
        GLsizei(image2.height),
        0, GL_RGBA, GL_UNSIGNED_BYTE,
        $0.baseAddress)
}
glGenerateMipmap(GL_TEXTURE_2D)
glBindTexture(GL_TEXTURE_2D, 0)
To use the second texture (along with the first texture) we’d have to change the rendering procedure a bit by binding both textures to the corresponding texture unit and specifying which uniform sampler corresponds to which texture unit:
glActiveTexture(GL_TEXTURE0)
glBindTexture(GL_TEXTURE_2D, texture1)
glUniform1i(glGetUniformLocation(ourShader.Program, "ourTexture1"), 0)
glActiveTexture(GL_TEXTURE1)
glBindTexture(GL_TEXTURE_2D, texture2)
glUniform1i(glGetUniformLocation(ourShader.Program, "ourTexture2"), 1)

glBindVertexArray(VAO)
glDrawElements(GL_TRIANGLES, 6, GL_UNSIGNED_INT, nil)
glBindVertexArray(0)
Note that we’re using glUniform1i to set the location or texture-unit of the uniform samplers. By setting them via glUniform1i we make sure each uniform sampler corresponds to the proper texture unit. You should get the following result:
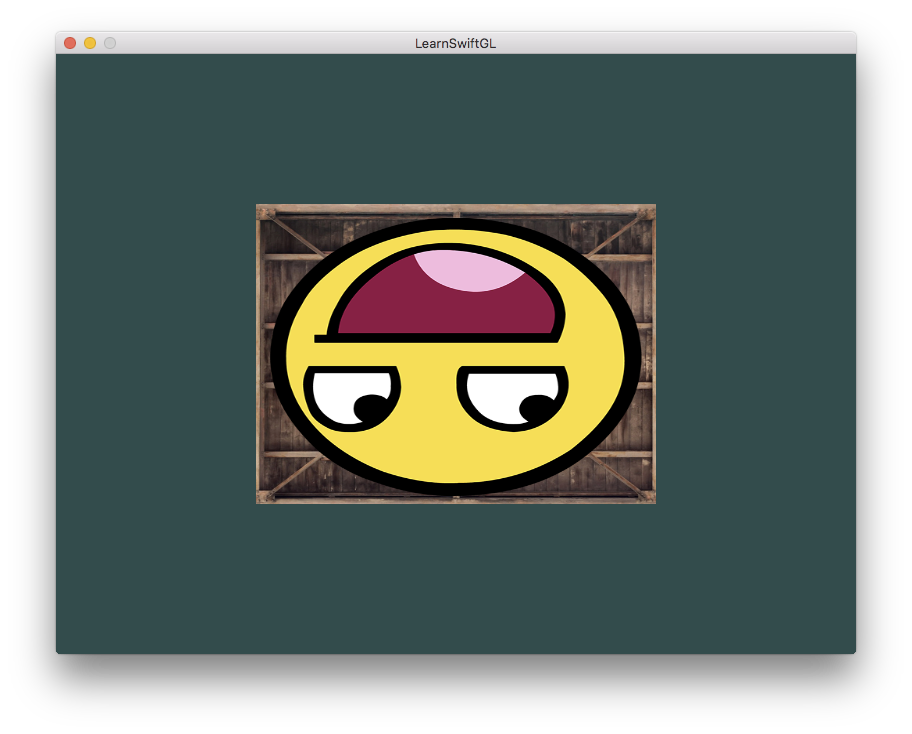
You probably noticed that the texture is flipped upside-down! This happens because OpenGL expects the 0.0 coordinate on the y-axis to be on the bottom side of the image, but images usually have 0.0 at the top of the y-axis.
You could mathematically flip the y-axis at any number of places in code or invert your texture coordinates. But then half your program is working with the image in one direction, and the other half in the other direction. Instead, we’ll use a feature of SGLImageLoader to immediately load the image in the desired format. There’s two ways to do this:
// Option 1. Global setting. All new SGLImageLoader
// instances will default to this setting.
SGLImageLoader.flipVertical = true

// Option 2. Instance setting. Every instance you don't
// want using the global setting must be changed.
loader2.flipVertical = true
Once you’ve flipped the y-coordinates you should get the following result:
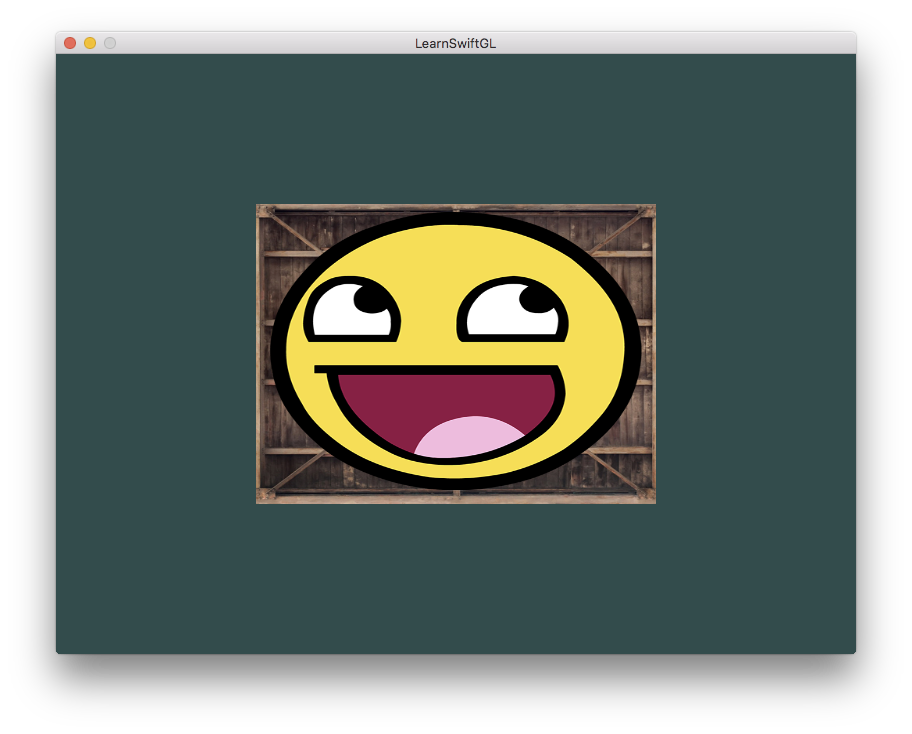
If you see one happy container, you did things right. You can compare it with the source code if you have problems.
Exercises
To get more comfortable with textures it is advised to work through these exercises before continuing.
- Make sure only the happy face looks in the other/reverse direction by changing the fragment shader.
- Experiment with the different texture wrapping methods by specifying texture coordinates in the range 0.0 to 2.0 instead of 0.0 to 1.0. See if you can display 4 smiley faces on a single container image clamped at its edge. See if you can experiment with other wrapping methods as well.
- Try to zoom into the center pixels of the texture image on the rectangle in such a way that the individual pixels become distinctly visible (by changing the texture coordinates). Try to set the texture filtering method to
GL_NEARESTto see the pixels more clearly. - Use a uniform variable with the mix function’s third parameter to vary the amount the awesome face is visible. Use the up and down arrow keys to change how much the container or the face is visible.